WHAT IT ANODISING?
Aluminium reacts with the air to form a natural layer of aluminium oxide which provides it with decent corrosion resistant surface. Anodising is the process of artificially thickening that layer for dyeing, extra gluing strength or just for increased corrosion resistance.
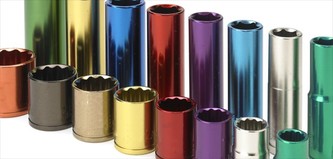
<– This is what dye anodised aluminium looks like (cool hey!!)
FOR A CHEMISTRY EXPERIMENT I'M TRYING TO ANODISE ALUMINIUM
From what I’d seen on YouTube it looked quite simple. I can tell you now it isn’t as easy as it looks. After 4 months of research, I think I’ve found out everything about how to do it and decided to share the information so it’s all in one place :).
METHOD
Degreasing:
WHAT'S A NON ETCH ALKALI?
It’s just an alkali that doesn’t react with the aluminium itself. This way, it removes the trash from the surface but doesn’t affect the aluminium surface.
Etching:
The naturally occurring oxide layer must be removed before anodising. To do this, the aluminium is etched in sodium hydroxide for 8 -10 minutes. The sodium hydroxide reacts with the aluminium and strips the surface ready for anodising.
Desmutting:
The surface has been stripped down by the sodium hydroxide, but some of the compounds formed in the reaction of the aluminium and sodium hydroxide are insoluble and stick to the surface. The only way to remove this is to put the piece of aluminium in a desmutting solution. These can be bought commercially online, or made in the lab. Nitric acid is a good desmutting solution. You should be able to see a big change in the appearance of the surface before and after desmutting.
Anodising:
Finally, anodising! Well I must warn you this part is also complicated. Anodising is ideally done at 20 degrees C. Even though the room temperature may be 20 C, you still have to be careful that your anodising solution doesn’t go above as when the electricity runs through it, it will heat up. Your anodising solution should be 15% sulphuric acid.
WHAT ABOUT THE AMPS AND VOLTS?
Your amperage should ideally be 1 – 2 Amps per square decimetre of surface area. This gives you a pretty big range to play around with. The voltage range is also quite big, 12 – 24 volts. As long as you stick within those ranges you should be good.
HOW LONG?
The anodising should go for 20 – 40 minutes. This is another variable you can play around with. The lower amperage you use the longer you should run it for though. This doesn’t mean that if you have a voltage that is less than 1 amp per square decimetre, that you can just run it for longer and it will be fine. No. You can’t do that
WHY?
The oxygen formed on the surface of the aluminium by the electricity that builds up the oxide layer is fighting against the sulphuric acid. If the amperage is too low, the sulphuric acid will dissolve the aluminium oxide faster than the electricity creates it. Extending the time won’t make any difference.
Neutralising
After your piece has been anodised for 20 – 40 minutes, there’s no doubt it will be completely covered in sulphuric acid. This will continue to eat away at the surface unless you get rid of it. The easiest way is to neutralise it in a base that won’t react with your piece. The easiest and most effective solution for the job is a solution of bicarb soda. If you don’t neutralise the acid on the surface, it will affect the dyeing of your piece and the overall anodising finish.
Dyeing
Because of the nature of the anodised surface, your piece can be dyed quite easily. To do this you have 2 options. Either you can spend a fortune on industrial anodising dyes that are almost invincible, or your can buy (specific) fabric dyes that will dye the aluminium well, but may fade over time. I have gone the cheap route because I’m poor and used fabric dyes.
WHICH FABRIC DYES CAN I USE?
Firstly, do not even try dylon brand dyes. They DO NOT work. There is only one line of dylon dyes that work and it’s a line that basically no longer exists because no one bought it. If you do want to try it, the only one I’ve heard that works is the Dylon Multi-purpose dye range.
From experience, Rit dye is a very good dye for anodising. Almost every single dye in their range works well, although colours may not come out as they look on the bottle for the simple reason that they’re meant for dying clothes not aluminium.
The dye should ideally be heated up to 50C to work at it’s best but a lot of people (including me) don’t bother.
Sealing:
The anodised surface needs to be sealed regardless of whether you’ve dyed it or not. I you don’t seal it, it will degrade quickly and easily. The sealing process is surprisingly easy. You can either boil the part in a professional sealing liquid, or in regular water for 20 minutes to an hour. Simple as that.
AND THAT'S EVERYTHING I WISH I KNEW 5 MONTHS AGO
It took me a lot of research, trial and error to find all of this out so I thought that compiling everything I have found out would hopefully help the next person who attempts to do the same.